


In the digital age, where user-generated content floods online platforms, maintaining the integrity and safety of these environments has become a challenge. Particularly in applications where users are encouraged to upload, share and comment images, the task of moderating this content to ensure it adheres to community standards and is free of inappropriate material is both critical and difficult. However, with the advent of Oracle Cloud Infrastructure (OCI) AI services, a revolutionary shift is occurring. This article explores the technical details of incorporating OCR technology and image classification models into APEX applications. It offers a detailed guide on how to use OCI AI services to improve moderation processes.
The sample application we're going to build in this article is an online marketplace for selling secondhand items. We aim to categorize items and flag unwanted items, such as drugs or weapons. The application and code can be found on my GitHub.
OCI AI services
Oracle Cloud Infrastructure (OCI) AI services encompass a suite of machine learning and artificial intelligence tools designed to automate and enhance various processes across different industries. These services include capabilities for language, speech, and vision. Specifically, they offer tools for text analysis, speech recognition, image and video analysis, and predictive analytics, among others. By leveraging these services, businesses can improve operational efficiency, enhance customer experiences, and innovate faster by integrating AI into their applications and workflows.
Vision
One of the AI services offered is Vision, where you can upload images to detect and classify objects within them. If you have a large number of images, you can process them in batches using asynchronous API endpoints. The available pretrained models include:
Object detection
Image classification
Face detection
Optical Character Recognition (OCR)
You also have the option to create a custom model for object detection or image classification. However, in this article, we will focus on using the pretrained models to label images individually.
Creating REST Data Source
To use Vision in your APEX application we need to make a web credential and a rest data source. The web credential will be used to authenticate the rest data source. Below the steps needed to make the rest data source
Within the OCI console, navigate to Identity → My Profile. Select API keys from the Resources menu and click Add API key
Download the private key and click Add
Copy the API key preview from the popup window, you'll need the listed parameters in APEX.
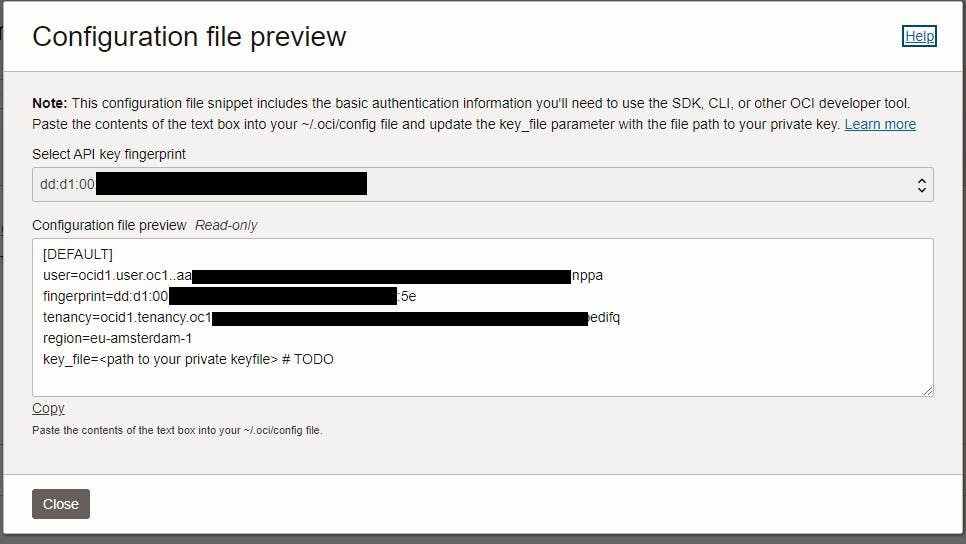
Open the APEX builder and navigate to Workspace Utilities → Web Credentials and click on Create
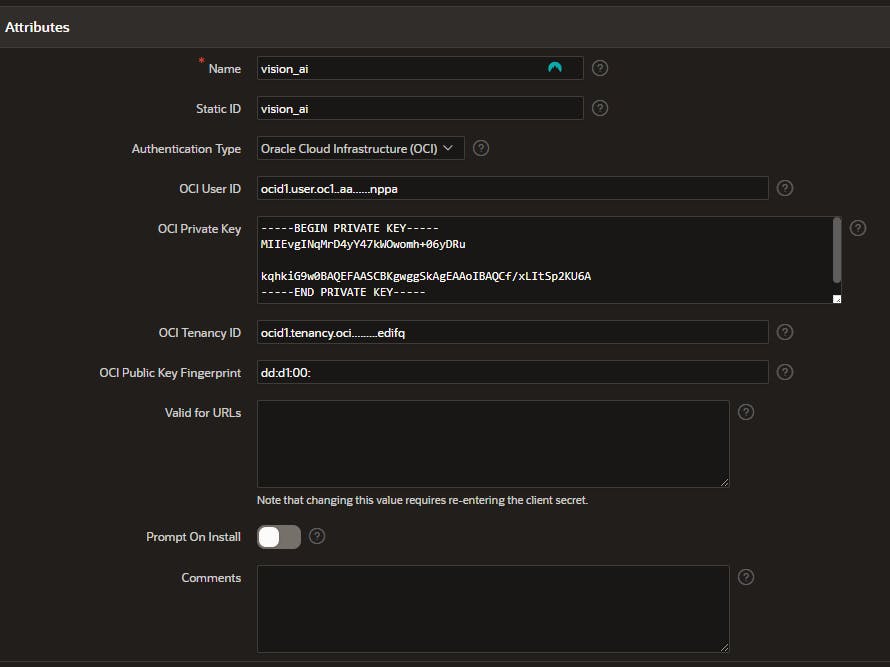
Select a name for the credential and fill in the details you just copied from the API key. The authentication type should be Oracle Cloud Infrastructure (OCI)
Open the private key and copy the text into the OCI Private Key text field and click Create
Now, create or import an APEX application (I assume you're familiar with these steps)
Create a new rest data source by navigating to Shared Components → Data Sources → REST Data Sources, click Create and select From scratch
Give the data source a name
The URL-endpoint is based on the location of your OCI. The endpoints can be found here. Then add the AnalyzeImage service: /20220125/actions/analyzeImage to the URL.
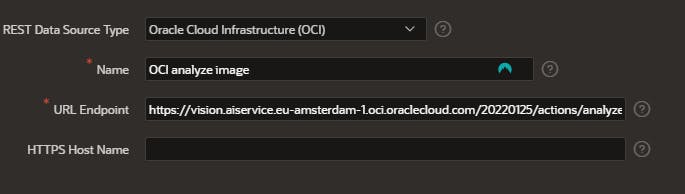
Click Next until you reach the Authentication step. At this point, you should turn Authentication Required on and choose the credentials you just created.
The service has some required parameters so we have to manually create the rest source. Click Create REST Source Manually.
Within the REST data source, edit the POST operation
Set the database operation to Not mapped and add the following JSON to the Request body template
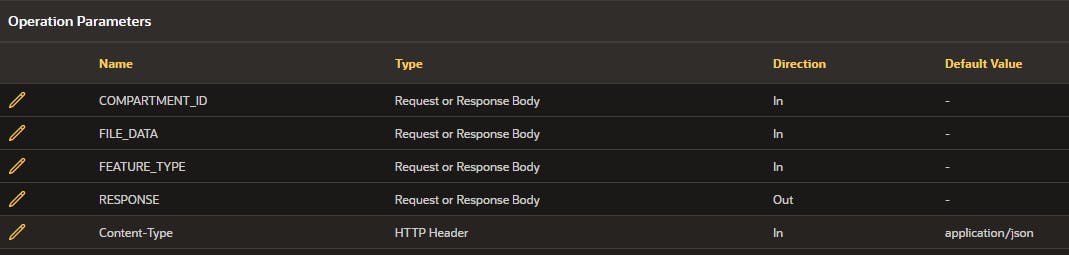
{
    "compartmentId": "#COMPARTMENT_ID#",
    "image": {
        "source": "INLINE",
        "data": "#FILE_DATA#"
    },
    "features": [
        {
            "featureType": "#FEATURE_TYPE#",
            "maxResults": 5
        }
    ]
}
Finally, we need to add operation parameters. Below are the parameters you should add. Set the Content-Type to static, ensuring the default value is always used.
Now you're ready to use Vision to label your images.
Upload and analyze image
Next, we need to create a page that lets us upload and analyze images. I've chosen a layout with a cards region. In a drawer, I've set up a form that allows users to upload an image into a BLOB column, using the standard Form - Automatic Row Processing feature. Instructions for creating such a page are available in the Sample Cards application, which you can install from the Gallery.
Once the user uploads an image, we can proceed with the analysis. The execution chain, introduced in APEX 23.1, is ideal for linking multiple processes and allowing them to run in the background.
First we're going to make a process of type invoke API, here we select the created Vision REST source, the parameters will be added automatically. We only need to fill the parameters with the correct values:
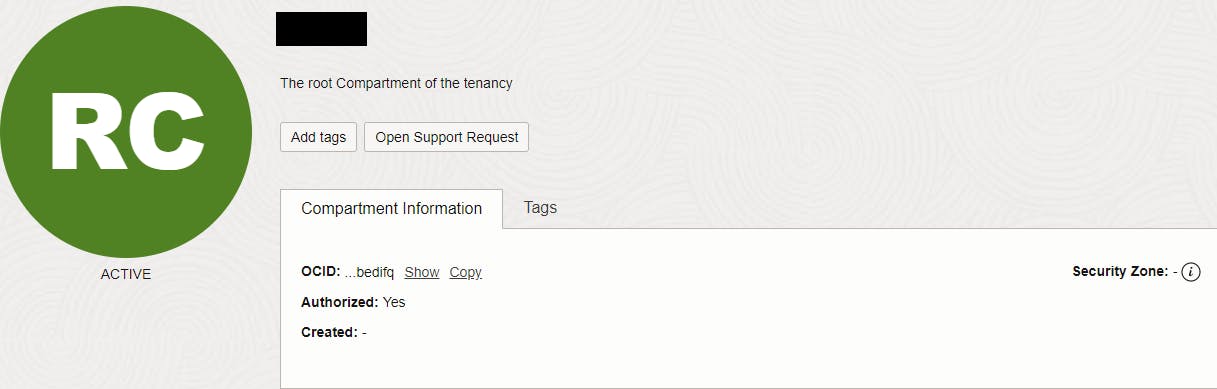
COMPARTMENT_ID: in the OCI console navigate to identity → compartments pick the root compartment and copy the OCID
FEATURE_TYPE: here we specify which model should be used, in this example we pick IMAGE_CLASSIFICATION to label the image. All features can be found here.
FILE_DATA: the actual image converted to base64 with new lines and carriage returns removed
  select
    replace(replace(apex_web_service.blob2clobbase64(blob)
      , chr(10), '')
      , chr(13), '') as image
  from items
  where id = :P2_ID;
RESPONSE: Add the response to a page item so it can be used in a later step. For convenience I named the item P2_REPSONSE.
Now, we can update the ITEMS table to include the labels for the image. The response has several parts, such as imageObjects, labels, and OntologyClasses. We're mainly focused on the labels array right now. This array is made up of objects that have a name and a confidence level. The confidence level indicates how certain the model is about the label it has given. In our application, we only save labels that have a confidence level greater than 0.85. Below the result of a image with a chair.
"labels": [
  {
    "name": "Chair",
    "confidence": 0.98680276
  },
  {
    "name": "Metal",
    "confidence": 0.8731569
  },
  {
    "name": "Stool",
    "confidence": 0.7462843
  }
],
You can update the labels column with the labels from the P2_RESPONSE page item. Below is the update statement. I've used listagg() to combine all the labels into one column.
update items
set    labels = (select listagg(label, ':') within group (order by label)
                 from json_table(:P2_RESPONSE, '$.labels[*]' columns(
                    label       varchar2    path '$.name'
                 ,  confidence  number      path '$.confidence'))
                 where confidence >= 0.85
                 )
where  id = :P2_ID;
The labeling of images is now finished. I've also created a job that checks recently uploaded images for prohibited labels such as weapons, drugs, or sexual content. If a record contains any of these labels, it is flagged, and the image is hidden from the application.
Custom model
I've noticed that the pre-trained model struggles to identify drugs or sexual content accurately. I suspect this is because the model was trained with a relatively small dataset. Luckily, OCI allows us to create custom models using our own dataset. Here's how to do it:
Go to Analytics & AI → Machine learning → Data Labeling → Datasets in the OCI console and click on Create dataset.
- If you're not an administrator, you'll need to set up some policies. This requirement is listed in the prerequisites on the page.
Name your dataset and choose Images as the dataset format.
For the annotation class, select Single label or Multiple label, depending on whether you want to add one or multiple labels to your images.
Next, you can either upload images directly or select images from object storage. You need at least 10 images to train the AI, but using at least 50 is recommended for better accuracy. The more images you use, the more accurate the AI will be.
- If you choose to upload images directly, they will be stored in a bucket in object storage. So, either way, the images will end up in object storage.
Add label(s) to the selected images.
Review the dataset and click create.
Once the dataset is created, you can start creating and training a new model.
Go to Projects in Vision and create a project.
After creating the project, click on the link within it to create your new model.
Choose the model you want to train.
Select your created and labeled dataset from the previous step as training data and click next.
Name your new model.
Choose the training duration. For the best results, select the Recommended mode.
Review the parameters and begin the training.
When the training is complete, this model can be used to analyze your images. With a well-selected dataset, the labels should be more accurate than before.
Identify negative language
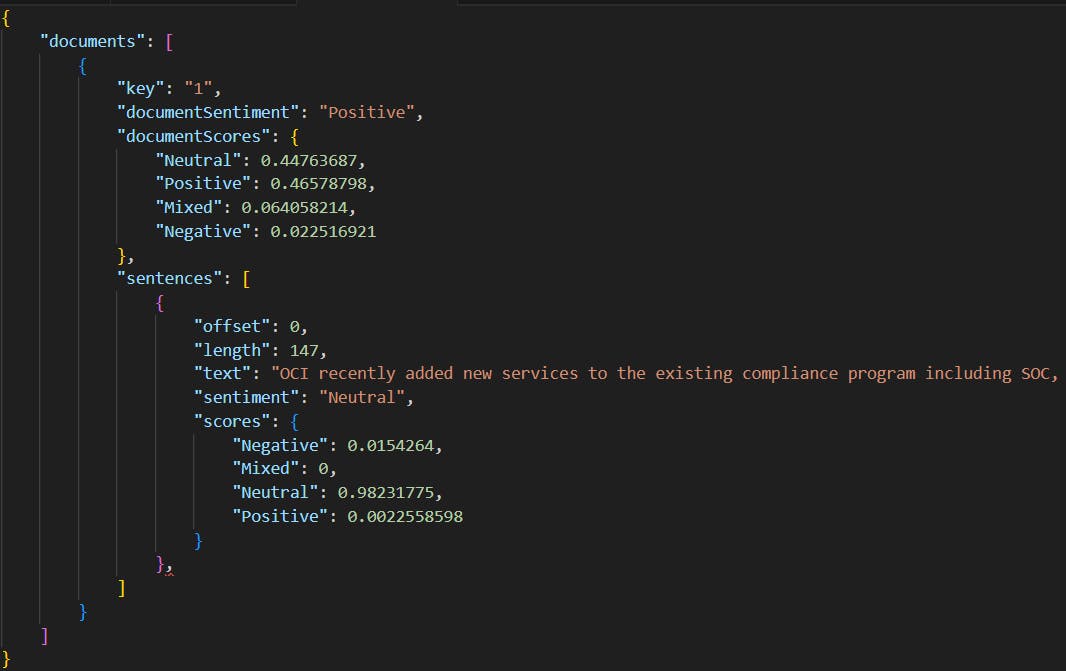
In addition to identifying unwanted images, we aim to automatically moderate negative language in descriptions and/or comments. Beyond Vision, there's another aspect of Analytics & AI, which is Language. The language models offer various options, including language detection and translation. We're particularly interested in the sentiment analysis model. This model examines the tone of a text. The Language service's sentiment analysis employs natural language processing (NLP) to comprehend the text and provides insights into positive, neutral, mixed, and negative sentiments, along with a confidence score. It supports both sentence-level and aspect-based sentiment analysis.
To create a new REST data source, follow the same process as for images. You'll need to change the URL and parameters. Here's an example data source:
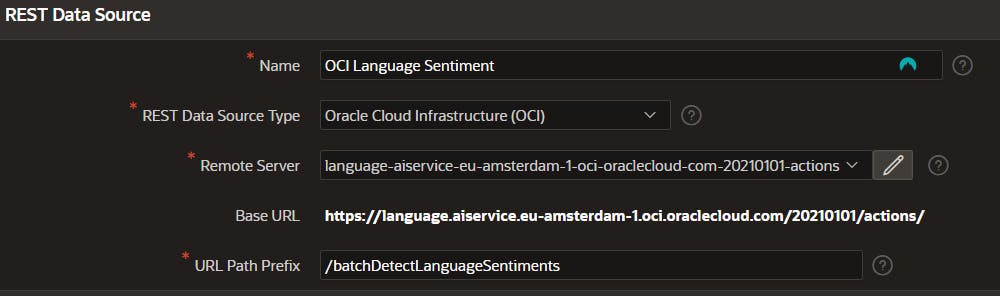
With POST parameters
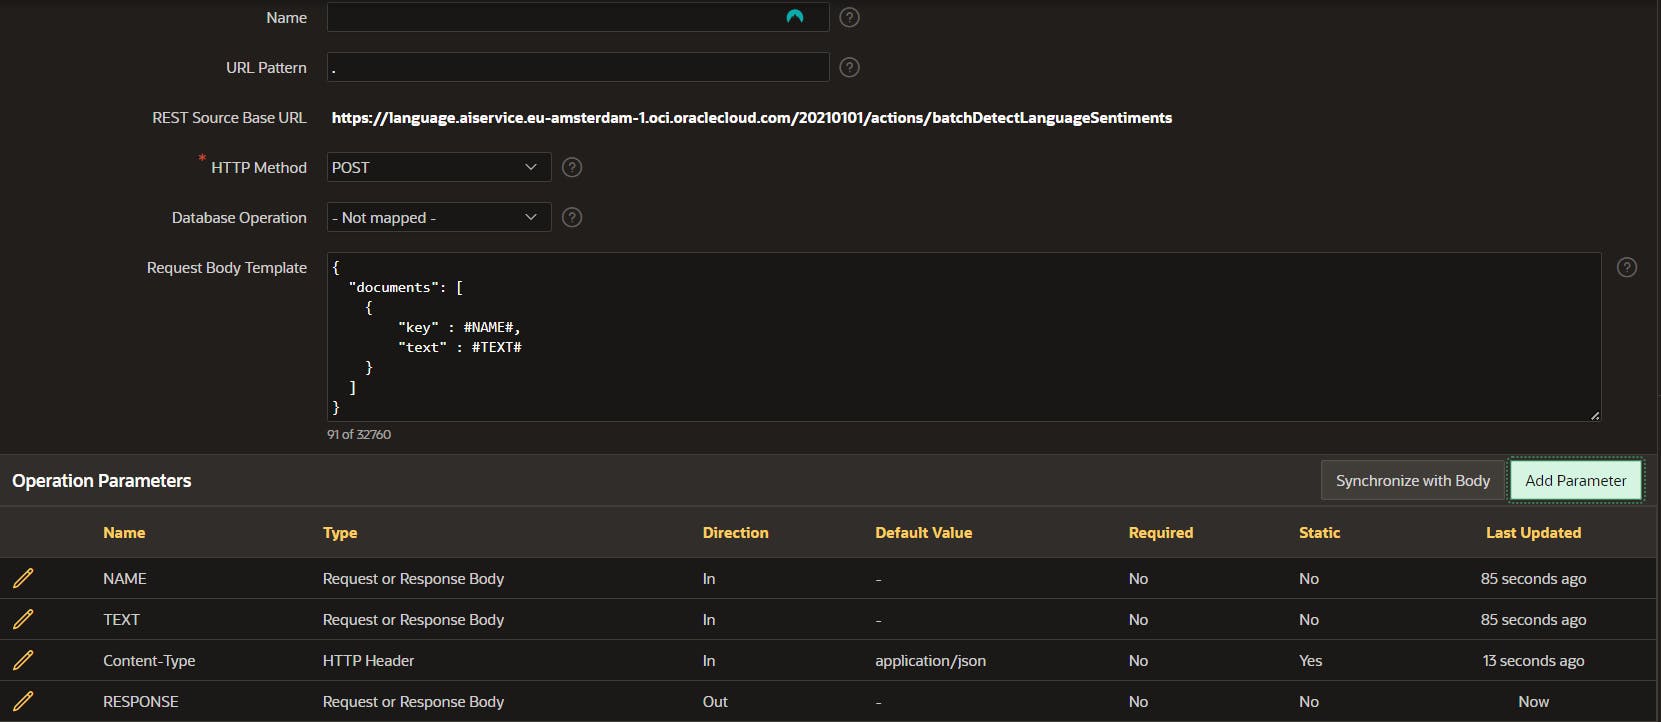
Once the REST data source has been successfully created, the procedure to invoke the API mirrors that of image analysis closely. At this stage, the power of the API comes into full play, allowing us to meticulously scan through descriptions for negative language. By setting a specific threshold, we can automatically filter out and hide descriptions that exceed this limit in negativity.
In addition to sentiment analysis, you can also identify specific words or phrases in text using entity recognition. This functionality is particularly useful for developers who are looking to pinpoint and identify specific words or phrases within a body of text. Entity recognition can be an invaluable tool in a variety of scenarios, such as when there's a need to filter out or exclude certain words or phrases from appearing in your application. The endpoint URL differs, but the parameters are the same.
Final steps
When all the individual components are created they can be chained together in one execution chain. This chain can run in the background so the end-users aren't limited to the processing speed of the AI services. By doing so, the system ensures that the functionality can proceed without interrupting or slowing down the user's interaction with the application. This background processing capability is crucial for maintaining a smooth and efficient user experience, especially in applications where real-time performance and responsiveness are key.
Conclusion
In conclusion, the integration of Oracle Cloud Infrastructure (OCI) AI services into APEX applications ushers in a new era of enhanced content moderation for online platforms. By leveraging the power of OCR technology and image classification models, developers can create more secure and user-friendly environments for sharing and commenting on images. This article has provided a comprehensive guide on how to utilize these AI services to categorize items effectively and flag inappropriate content, ensuring that community standards are upheld. Additionally, the exploration into custom model creation and sentiment analysis underscores the adaptability and depth of OCI's offerings. As digital platforms continue to evolve, the tools and techniques shared here will be invaluable for developers looking to harness the capabilities of AI for content moderation and beyond.